Showing posts with label Cooks Illustrated. Show all posts

Sunday, February 24, 2008

Sick Is The New Birthday

All fancy, decadent, piece-of-art cakes aside, my favorite cake is plain Jane yellow cake with chocolate frosting. I made a squee-like noise when the latest edition of Cook's Illustrated had a recipe for yellow layer cake with chocolate frosting. Squee!

I was saving CI's attempt at recreating a box mix yellow cake from scratch for my birthday, but I’ve been sick all week with nothing to do, so I jumped the gun by about a month. That’s OK, ‘cause I really want an ice cream cake for my birthday this year, anyway!How do they go about getting a light, moist, yellow cake like the ones from a box that you know your Sandra Lee-bashing self really loves? Delicate cake flour, whipped egg whites for lift, and egg yolks for color.

I ended up eating around most of the frosting. Don’t ask me how I could not love what was mostly butter, melted chocolate, cocoa powder, and confectioner’s sugar, but I didn’t. I much prefer the chocolate frosting (also from CI) I posted about a couple of years ago. I’m skipping the frosting intended for this cake and sending you straight to, in my opinion, the better frosting.

Yellow Layer Cake
Adapted from Cook’s Illustrated

2 ½ cups cake flour, plus extra for dusting pans
1 ¼ teaspoons baking powder
¼ teaspoon baking soda
¾ teaspoon salt
1 ¾ cups sugar
1 ¼ sticks butter, melted and cooled slightly
1 cup buttermilk, room temperature
3 tablespoons vegetable oil
2 teaspoon vanilla extract
6 large egg yolks plus 3 large egg whites, room temperature

  • Move oven rack to the middle of the oven, and preheat to 350°.
  • Grease two 9” round cake pans and line bottoms with parchment paper. Dust pans with flour.
  • Mix together flour, baking powder, baking soda, salt, and 1 ½ cups sugar in a large bowl.
  • In a separate bowl, mix together melted butter, buttermilk, oil, vanilla, and egg yolks.
  • Beat egg white in a small bowl until foamy, about 30 seconds. Then slowly add the remaining ¼ cup sugar to the egg white while beating. Continue to beat until whites hold peaks, but mixture still looks moist. (The original recipe calls for a mixing stand, but I did not have one. I used a hand held beater, and had to beat for much longer than the prescribed 60 seconds to get peaks.)
  • Add butter mixture to flour mixture and beat until just incorporated. Gently fold in 1/3 of the egg white mixture, then add the remaining egg white mixture and gently fold in until fully incorporated.
  • Divide batter between two pans, tapping filled pans gently on counter to dislodge air bubbles.
  • Bake 20-22 minutes or until done.
  • Cool 10 minutes before removing cakes from pan. Remove cakes from pan, and cool on a cooling rack for 1 ½ hours before frosting.

Friday, November 23, 2007

Apple-Cranberry Pie

I should have participated in that post-every-day-in-November-cause-I’m-a-badass-blogging-mofo NaBloPoMo, ‘cause I have posts out the wazoo to get around to. I’m trying really hard to stick to my normal regularity of posting, but the shit’s getting backed up. I’ve got about six restaurant reviews to get around to, and the unveiling of my winter project, but other posts keep popping up. I can’t decide…do I post that restaurant review, or get started on the winter project, or post that timely recipe? Timely recipe wins.

I made the apple-cranberry pie from Cook’s Illustrated for Thanksgiving. It’s the pie that came with the revolutionary foolproof vodka pie crust, but Smitten Kitchen beat me to the punch on the pie dough (she beats everyone, so no biggie).

Smitten Kitchen just reneged her recommendation of the pie crust due to its stickiness, but still declares it the flakiest yet. I experienced stickiness when mixing the dough, but after the dough slept in my fridge overnight bundled in plastic wrap (at least 45 minutes in the fridge is recommended, but I stretched the pie making over two days), the stickiness was no more. Rolled out perfectly. And the baked crust? Flakiest yet.

So, no more on the crust. Go get the recipe at Smitten Kitchen. The cranberry and apple filling, though! Yum! I’m not a die hard apple pie fan, and wondered why I was even making an apple pie – other than the fact that Cook’s Illustrated wills me to make their recipes through mind control.

The cranberry mash is layered on the bottom of the pie, and apple slices sit on top, guaranteeing cranberry and apple in every bite, but no mixing or polluting of the individual flavors. The scent of butter, apples and roses seduced me as I drove the 45 minutes to my friend’s house for Thanksgiving with the warm pie riding shotgun.

Sorry for no final pie-innards picture (it’s rude to run around with a camera at someone else’s Thanksgiving table). But, trust me; it was beautiful and tasty. Cranberries and apples work well at Christmas, too, ya know! Apple-Cranberry Pie
adapted from Cooks Illustrated

2 cups frozen or fresh cranberries
¼ cup orange juice
1 cup granulated sugar plus 1 tablespoon for top of pie
½ teaspoon ground cinnamon
½ teaspoon table salt
¼ cup water
1 tablespoon cornstarch
3 ½ pounds sweet apples (6-7 medium), peeled, cored, and cut into ¼-inch-thick slices
1 recipe Foolproof Pie Dough
1 egg white, beaten lightly

  • Bring cranberries, orange juice, ½ cup sugar, ¼ teaspoon cinnamon, and 1/4 teaspoon salt to a boil in a saucepan over medium-high heat. Stir occasionally, while pressing the berries against the side of the pan with a spoon to assist in breaking the berries down. Cook for 10-12 minutes or until the berries achieve a thick consistency (scrapping spoon across bottom of pan leaves a trail that does not fill in). Remove from heat, and stir in water. Cool to room temperature (30 minutes).
  • Meanwhile, mix ½ cup sugar, ¼ teaspoon cinnamon, ¼ teaspoon salt, and cornstarch in large microwave-safe bowl. Add apples and toss to coat. Microwave on high, stirring every 3 minutes, for 10-14 minutes or until the edges of the apples are slightly translucent and liquid has thickened. Cool to room temperature (30 minutes).
  • Move oven rack to the bottom and place a baking sheet on the bottom rack. Preheat oven to 425°.
  • Roll one disk of the refrigerated dough out to a 12-inch circle about 1/8-inch thick on a generously floured surface. Place dough in pie pan, leaving a 1-inch dough overhang. Refrigerate for 30 minutes.
  • Spread the cranberry mixture evenly in the dough-lined pie pan. Top with apple mixture.
  • Roll the second dough disk out to a 12-inch circle about 1/8-inch thick on a generously floured surface. Place on top of the pie, leaving a 1-inch overhang.
  • Cut both layers of the overhanging dough, leaving ½ inch overhang. Fold the dough under so it’s flush with the pie pan edge. Crimp pie edges. Brush top of pie with egg whites, and sprinkle with 1 tablespoon sugar. Cut slits in top of pie dough.
  • Place pie on preheated baking sheet and bake for 20-25 minutes. Reduce oven temperature to 375°, rotate baking sheet, and continue to bake for 25-30 minutes, or crust is deep golden brown.
  • Cool for at least 2 hours before serving.

Tuesday, October 23, 2007

White Chili

One of my favorite things to do is kill two (or more if I'm really good) birds with one stone. Whether or not this philosophy of action is time-saving or efficient, I like to think it is. A one-mile-or-so round-trip walk through the city from my Philly digs allows me to stroll past the farmer’s market at Headhouse Square, the Italian Market, and the Asian grocery stores along Washington Street to gather groceries – a very efficient grocery route if done in one outing.

I visited all of these places last week in order to gather ingredients for this recipe…but I did not follow my own philosophy of action. I went to the Asian market for seitan, limes, and cilantro, and then returned home. I then went to the farmer’s market for poblano and Anaheim chilis…and came home. Finally, I went to the Italian Market for cannellini beans. Not efficient.

With all of these ingredients back at home, along with kitchen staples, homegrown jalepenos, and home-canned yellow tomato sauce (sauce is orangish), I was ready to tackle the white chili recipe from Cooks Illustrated – a magazine that has NEVER let me down, unlike…cough cough…Bon Appètit.

But white chili doesn’t have tomato sauce in it! Nope. And neither does the recipe in Cook’s Illustrated. A few months ago I sat in the car discussing the best use of yellow tomato sauce with the friend who supplied me with the jar. Yellow tomatoes are less acidic than red tomatoes, and it didn’t seem right to waste yellow tomato sauce on a dish that called for the classic acidic red tomato sauce. The only thing we came up with was white chili. (Any other suggestions?) So, I adapted a white chili recipe in a past copy of the infallible Cook’s Illustrated to include the yellow tomato sauce.

The original recipe calls for chicken and chicken stock, but I subbed seitan, and 2/3 of the chicken stock with the yellow tomato sauce, and the remaining chicken stock with vegetable stock. Obviously, not every one is going to have yellow tomato sauce on hand, so just keep with the stock in the original recipe (3 cups), or blend some fresh yellow tomatoes in a food processor.

I never want regular chili again. Really. I’m tellin’ ya, Cook’s Illustrated does not fail - even with me futzing with the recipe! I'm happy to report that I efficiently killed two bowls in one sitting.

White Chili
Adapted from Cook’s Illustrated
serves 6-8

2 (10-ounce) cans seitan, drained and chopped into 1-inch pieces
1 tablespoon vegetable oil
3 poblano chiles, stemmed, seeded, and cut into large pieces
3 Anaheim chiles, stemmed, seeded, and cut into large pieces
2 medium onions, cut into large pieces (2 cups)
3 medium jalapeno chiles, stemmed, seeded, and minced
6 garlic cloves, minced
1 tablespoon cumin
1 1/2 teaspoons coriander
1/4 teaspoon salt
2 (15-ounce) cans cannellini beans, drained and rinsed
2 cups yellow tomato sauce
1 cup vegetable broth
3 tablespoons lime juice
1/4 cup fresh cilantro, minced
4 scallions, sliced thinly

  • Heat oil in a large skillet or pot over medium-high heat, and brown seitan (about 5 to 10 minutes), and remove from the skillet.
  • In a food processor, pulse 10-12 times (1 second each) half of the poblano chiles, Anaheim chiles, and onions until the consistency of chunky salsa. Transfer to a bowl, and repeat with the remaining poblano chilies, Anaheim chilies, and onions. Combine with the first batch. (Do not wash the food processor.)
  • Add the minced jalepenos (more or less depending on heat preference - I went with one), chile-onion mixture, garlic, cumin, coriander, and 1/4 teaspoon salt to the skillet, adding more vegetable oil if necessary. Cover and cook over medium heat for 10 minutes, stirring occasionally.
  • Transfer 1 cup of the cooked vegetable mixture, 1 cup of beans, and 2 cups of the tomato sauce to the food processor and process until smooth.
  • Return the mixture from the food processor back to the skillet with the chile-onion mixture, and add the vegetable broth, browned seitan, rest of the beans, lime juice, and cilantro. Cook over medium heat until thickened slightly, about 10 minutes. Season with salt and pepper.
  • Serve with scallion garnish.

Tuesday, February 20, 2007

Thai-Style Chicken Soup

The Thai-style chicken soup featured in the Jan/Feb 2007 issue of Cook's Illustrated Magazine is my new favorite soup! I’ve made it three times already! (Well, my partner made it twice, and I made it once.)

Mushrooms and chicken (seitan) swim in the rich, creamy, coconut-based broth infused with lemon grass and lime. Red curry paste and chiles add a pleasant spiciness.

The first time
we made the soup, we followed the recipe to a tee, with the exception of substituting vegetable broth for chicken broth, seitan for chicken, and soy sauce for fish sauce to make the dish vegetarian.

The second time
, we added thin rice noodles to the soup for bulk.

The third time, we added rice. We also substituted low-fat coconut milk for whole coconut milk, and green curry paste for red curry paste.

I liked the addition of rice the best. Low-fat coconut milk is obviously not as rich as whole coconut milk, but does not compromise the soup. Pick your favorite curry paste. I have no preference for green or red curry paste, so enjoyed them both equally.

Thai-Style Chicken Soup
Adapted from Cook’s Illustrated
serves 4

1 teaspoon vegetable oil
3 lemon grass stalks, bottom tender 5 inches halved lengthwise and sliced thinly
3 shallots, chopped
8 sprigs of cilantro, chopped coarsely
3 tablespoons soy sauce (originally fish sauce)
4 cups vegetable broth (originally chicken broth)
2 (14-ounce) cans coconut milk
1 tablespoon sugar
½ pound button mushrooms, sliced
1 pound seitan, sliced or cubed (originally boneless, skinless chicken breast)
3 tablespoons lime juice
2 teaspoons Thai red curry paste

Garnish
½ cup cilantro leaves
2 serrano chiles, thinly sliced
2 scallion, thinly sliced
1 lime, cut into wedges

  • Heat oil in a large saucepan and add lemon grass, shallots, cilantro, and 1 tablespoon of soy sauce. Cook over medium heat until softened, 2-5 minutes.
  • Add vegetable broth and 1 can of coconut milk; bring to a simmer. Cover, reduce heat to low, and simmer for 10 minutes.
  • Pour broth through a fine-mesh sieve and discard solids. Return broth to saucepan.
  • Add remaining can of coconut milk and sugar to broth and bring to a simmer.
  • Reduce heat to medium, add mushrooms, and cook 2-3 minutes.
  • Add seitan, and cook for another 1-3 minutes. Remove from heat.
  • Combine lime juice, curry paste, and remaining 2 tablespoons soy sauce in a small bowl; add to soup.
  • Garnish individual soup-filled bowls with cilantro, chiles, and scallions. Serve soup with lime wedges.

Thursday, June 22, 2006

Key Lime Bars

My boyfriend needed a PO box because he was going away for a while – job, not jail. I suggested that he save his money and have his mail forwarded to my house. I told him I’d be able to open important letters if need be, but I had ulterior motives. I really just wanted his subscription to Cook’s Illustrated.

Cook’s Illustrated approaches recipes scientifically. They test all sorts of ingredients, methods and tools in order to come up with what they think is the best possible recipe. While most of the dishes are meat based, they usually throw in a few desserts or a vegetable side. Also, don’t miss their great tips on the best tools and store bought foods.

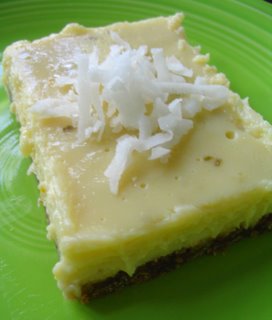
My birthday cake came from Cook’s Illustrated and it was awesome. Last week I tried Key Lime Bars from the current issue. I like things tart and almost added more zest than called for, but restrained myself and actually followed the recipe. It was tart to my liking, and to die for!

~I could eat sweetend condensed milk with a spoon. I love it so.~

Key Lime Bars
adapted from Cook's Illustrated

Crust
5 ounces animal crackers
3 tablespoons brown sugar
pinch of salt
4 tablespoons unsalted butter, melted and cooled

Filling
5 ounces cream cheese, room temperature
1 tablespoon minced lime zest
pinch of salt
1 can sweetened condensed milk
1 large egg yolk
½ cup fresh lime juice

Garnish
¾ cup toasted shredded coconut

  • Preheat oven to 350° and adjust oven rack to middle position.
  • Line 8x8 inch baking pan with tin foil, leaving overhang that can be used as handles to lift the bars from the pan. Spray foil with non-stick spray.
  • Pulse animal crackers in a food processor until finely crumbled. Add sugar and salt and pulse. Add butter and pulse until combined. Press crumbs firmly into bottom of baking pan. Bake until golden, 18-20 minutes. Cool.
  • Stir cream cheese, lime zest, and salt in a bowl until softened and combined. Add sweetened condensed milk and whisk until incorporated and lumps are gone. Whisk in egg yolk. Gently whisk in lime juice.
  • Poor filling into crust and smooth surface. Bake 15-20 minutes or until set and edges start to pull away slightly from the sides of the pan. Cool 1-1 ½ hours. Cover with tin foil and refrigerate for at least 2 hours.
  • Loosen edges and lift bars from the pan. Cut into squares and garnish with toasted coconut.